Automating a Greenhouse
Lesson Information
A smart greenhouse wouldn’t be smart if it could not do things on its own. The key is to use sensors to monitor environmental variables, and then control other things based on the values from the sensors. In this lesson, we are going to learn exactly that.
The purpose of the lesson is to:
- Learn how to use sensors and actuators to control the smart greenhouse
- Understand what boolean variables are
- Learn how to use
if-elseconditionals (orifstatements)
Driving Science Questions:
- How can we use data from our sensors to automatically control our greenhouse?
Science Concepts:
- climate control: regulation of temperature, humidity, and other environmental variables for optimal (most ideal) plant growth
Computer Science Concepts:
- boolean: a binary variable, having two possible values called “true” and “false.”
- conditionals or
ifstatements: when it is satisfied, activates some part of code.
Materials Needed:
MCU board, button, temperature sensor, Relay, Servo, (Optional: light sensor, LED strip), Reading Material
Target Skills:
- SWBAT control actuators with sensors
- SWBAT understand booleans and
ifstatements - SWBAT comfortably manage different devices in their code
Instructional Plan and Structure
Do Now! (10 minutes)
The way we turn on our Grow Lights is:
from displays import GrowLight
gl = GrowLight(port = 1)

gl.on()
In your composition notebook, write down what you would do if you were to turn on a device called Relay at Port 1. Just like GrowLight is one of the displays, the Relay is one of the actuators.
Actuators: Relays and Servos (15 minutes)
Since we have written the code for controlling a relay, let’s start with a relay with a battery and fan connected to it. The relay is basically an electronically controlled switch. Demonstrate to the students how a relay works like this (the students do not have to do this themselves):
First, use a 9V battery and a fan for demonstration. if you connect the red and black wires to the corresponding wires on the 9V battery clip, the fan will spin:
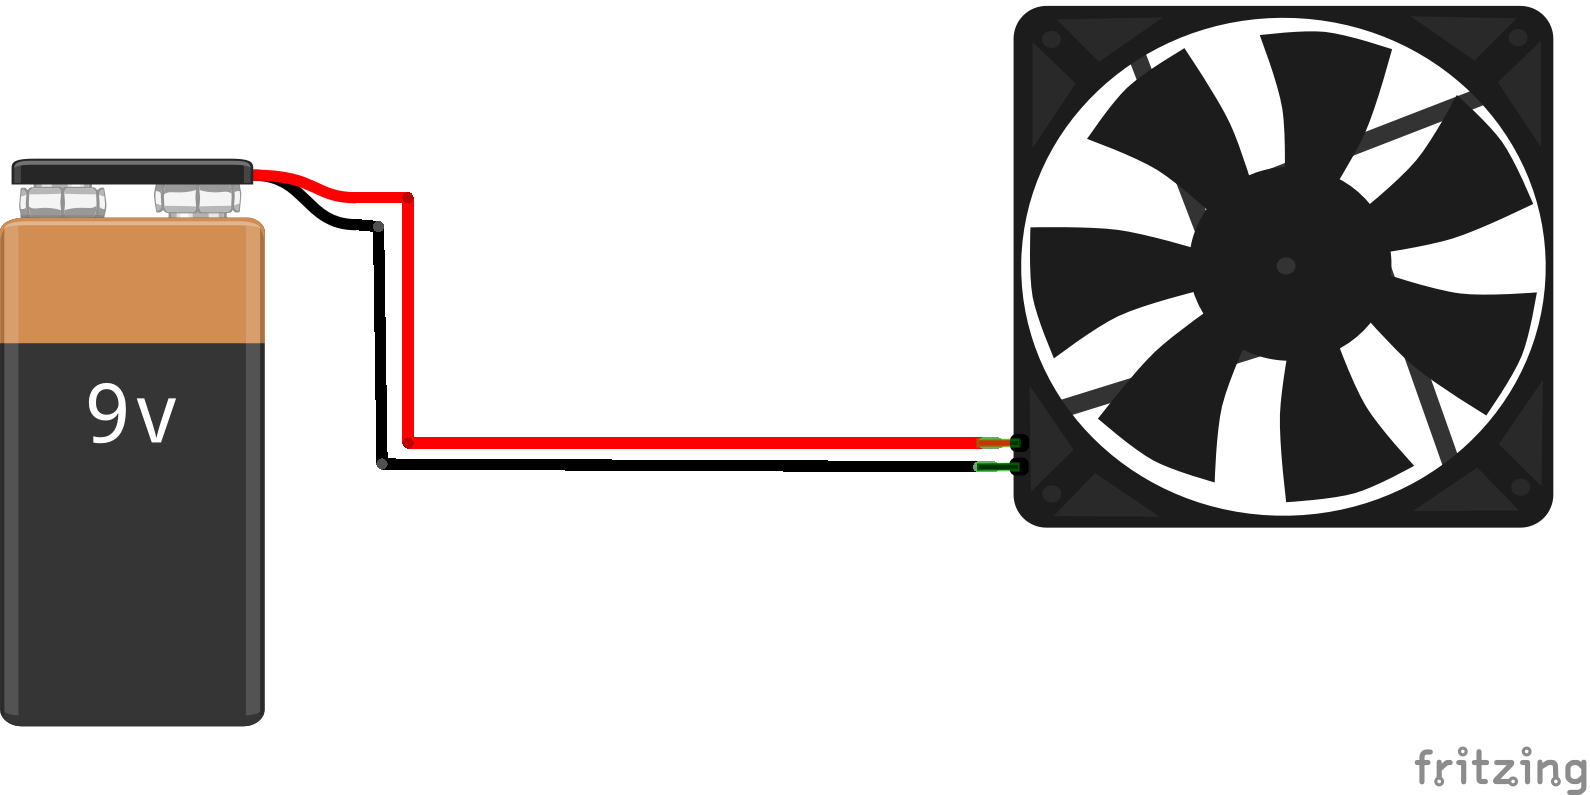
Now, keep the black wires connected (you might want to tape it). Explain to the students that if you connect a switch to both ends of the red wires, you can control the fans to turn on and off. The relay is that switch. You can use your microcontroller board to turn it on and off. Here is a video explains how it works:
Now that you know how it works, assemble your own relay and use your code that you just wrote to turn on the fan that is connected to it!
(Optional if you have already done this) Once you have finished turning on and off your relay, connect a servo to port 2 and try to control the servo with the following code:
from actuators import Servo
s = Servo(port=2)

s.set_position(90)
At this point, you can alter the numbers in the set_position function and see what happens.
A potentially helpful piece of code is this:
from actuators import Servo
import time

s = Servo(port=2)

while True:
    s.set_position(45)
    time.sleep(2)
    s.set_position(135)
    time.sleep(2)
What is happening? What do you think this code does?
Buttons and booleans (15 minutes)
Now swap your Servo with a button connected also to Port 2 (leave the relay connected to Port 1). Now the students should be very familiar with the following code to set up the button:
from actuators import Button
b = button(port = 2)
Show the students the button, ask the students if the button is pressed. Then press the button, and ask the students whether the button is pressed. We humans would probably answer “yes” or “no” to these questions. Computers do not know “yes” or “no” though. We have booleans to do that. Booleans are basically binary values of True or False (note the capitalization). For example, you can ask Python if the button is pressed with:
from actuators import Button
b = button(port = 2)

b.is_pressed()
Run the program, and you will see Python returns False. Run the program while the button is pressed, we will get True. In the terminal, type in some inequalities such as 2 > 4 or 625 == 25*25 to see whether we get True or False.
In Python and most other programming languages, we use double equal operator == to test equality. The single equal sign = is used for assignments.
We can use the button to control the Relay now. The rule is: if the button is pressed, turn on the fan, otherwise, turn off the fan. Reiterate this statement a few times. Our code will look very similar to what we just said:
from actuators import Relay, Button
r = Relay(port = 1)
b = Button(port = 2)

while True:
    if b.is_pressed():
        r.on()
    else:
        r.off()
Let’s take a deeper look at what we just did:
1.We used an if statement in our code for the first time. If statement looks like this:
if condition:
    # code when condition is satisfied (True)
else:
    # code when condition is not satisfied (False)
Here we, again, see colons and indentations. Be really careful about the colon after else. Also, indentations need to be aligned. Conditions here can be an inequality, or anything that evaluates to True and False
2.We enclosed the if statement in a while loop. Actually, most of the time we will need this loop when we are programming microcontrollers, because usually these devices need to run forever until we turn it off. From now on, we will call it the main loop.
3.If we are importing multiple device names from one module, we can write them on the same import line, separated by commas, just like Line 1.
Activity 3 (20 minutes)
Now we have all we need to use sensors readings to control the actuators. Disconnect your button, connect a temperature sensor to port 3. Out of the main loop, what do we need to change to set up the temperature sensor?
The code that uses temperature sensor (humidity value) to control the relay looks like this:
from sensors import TemperatureSensorPro
from actuators import Relay
import time

r = Relay(2)
tsp = TemperatureSensorPro(3)

while True:
    h = tsp.get_humidity()
    if h > 60:
        r.on()
    else:
        r.off()
    time.sleep(15)
That’s it! Now get the humidity to be really high and see the fan turning on and off!
Here’s something about this code again:
1.We get the humidity from the temperature sensor, and save it to a variable called h. We can later use this h to represent the temperature value. This is very similar to algebra.
2.Most sensors need some time to refresh and get a new reading, so we can’t read from it too often. Usually at least every 5-10 seconds. That’s why we need time.sleep() here.
3.By convention, we leave all import statements at the very beginning of your code. Likewise, we group all of the assignments nicknames/abbreviations/shortcuts together. We separate these groups of codes with a blank line. That makes your code more readable.
4.We separate the main loop from the set up code with a blank line as well.
5.You can omit the port= in your code, now that you know what the number means.
Additional Challenges
How do you use temperature, instead of humidity, to control the relay (fan)?
How do you use temperature/humidity to control a buzzer to sound an alarm if temperature/humidity is too high?
Can you use a light sensor to turn on/off the GrowLight if light is too low?
Review and Assessment
Please upload your final code to Google Classroom. Save your file in the format of wa1-0529.py.
Exit slip
- What is a boolean?
- What is a main loop?
Video diary
- What did you learn about science today? Did you have any problems understanding it? Why or why not?
- What did you learn about coding today? Did you have any problems understanding it? Why or why not?
- What do you want to learn tomorrow?